Swapping heads in photographs seems to be one of the favorite photo manipulations.
This tutorial shows how easy the task can be using Paint Shop Pro. Start by opening both photos. Continue the process by using the
Freehand Selection Tool, which is found under the
Learning Centers Home page, picking
Collage and then clicking
Make Selections. Choose the
Smart Edge option from the Tools Option Palette under selection type. Once your options are set, select the photo with the head you wish to use and you can begin tracing around the head. This should be done with several short selections. When the process is complete simply double click your mouse. Copy this selection to the clipboard by Pressing Ctrl + C, or choosing
Edit Copy.

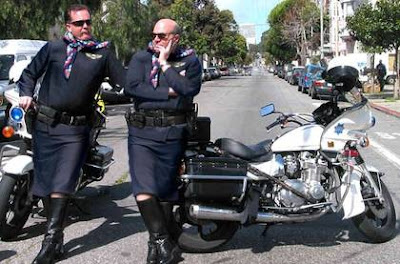
Now, make your receiving photo the active image (I chose an image of a couple of gay deputies from
Sandstone County) and then press Ctrl + L, or choose
Edit Paste As New Layer. From the
Learning Center’s Home page, choose
Collage, and then choose
Move Collage Elements and the pick tool will be activated. Resize your head and rotate as necessary. Finally, move the head into it's final position and save your work.
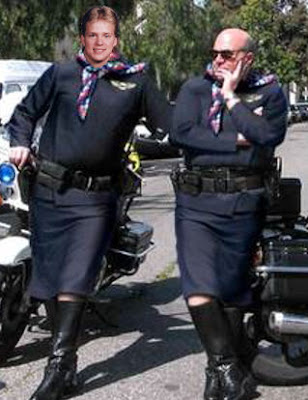
Here, I have cropped the photo of the gay deputies from
Sandstone County, so you could see the results better.
 Swapping heads in photographs seems to be one of the favorite photo manipulations. This tutorial shows how easy the task can be using Paint Shop Pro. Start by opening both photos. Continue the process by using the Freehand Selection Tool, which is found under the Learning Centers Home page, picking Collage and then clicking Make Selections. Choose the Smart Edge option from the Tools Option Palette under selection type. Once your options are set, select the photo with the head you wish to use and you can begin tracing around the head. This should be done with several short selections. When the process is complete simply double click your mouse. Copy this selection to the clipboard by Pressing Ctrl + C, or choosing Edit Copy.
 Now, make your receiving photo the active image (I chose an image of a couple of gay deputies from Sandstone County) and then press Ctrl + L, or choose Edit Paste As New Layer. From the Learning Center’s Home page, choose Collage, and then choose Move Collage Elements and the pick tool will be activated. Resize your head and rotate as necessary. Finally, move the head into it's final position and save your work.
 Here, I have cropped the photo of the gay deputies from Sandstone County, so you could see the results better.


2 comments:
Did Deputy Hidrent finally come out of the closet, or did you "out" him. How is he dealing with this? Does he have the support of his family? (I ask that, after noticing he has little support from the skirt he's wearing.)
I didn't out anyone. An oxymoron here. He didn't intentionally come 'out' but, if you act like a duck and sound like a duck . . .
Post a Comment