Showing posts with label Photography. Show all posts

Thursday, April 24, 2008

Photo Contest at ‘Are WE There Yet Mom’

There is a photo contest going on at are we there yet mom and it looks like she will hold more contests in the future. This particular contest has no theme, simply submit what you like. As a prize she is offering the book, Closeup Shooting: A Guide to Closeup, Tabletop and Macro Photography written by Cyrill Harnischmacher. The contest is going on until April 28th so hurry.


I thought I'd try this one which was taken this Easter.

and sorry
you may have seen this recently in a March post,
but I felt compelled to use it again here.

^

Sunday, February 10, 2008

My Saturday Drive Home

This was my drive home Saturday.
It was actually much worse than this - I only took a pic when I felt it was safe to do so.
As such, you only get to see the best conditions.


There was a car directly in front of me in both pics.
I think you can barely make it out in the 2nd photo.

By the way, I meant to moblog these but, have forgotten how.
Time for a refresher.
^

Sunday, November 18, 2007

Recognized at Unique's Photo Challenge

Seems I got a 'Noteworthy Mention' over at Unique's Photo Challenge for this photo. I submitted it for their 'Retro' Challenge. Thanks for the recognition.
^

Thursday, November 01, 2007

Enlisted New Photo Assistant

While on a photo shoot last august, I desperately needed someone to hold and aim a reflector for a macro shot I stumbled upon. I was by myself and I had no stands or other equipment which could hold a reflector. I poured myself some coffee and sat back to mull the problem over. As I slowly sipped on my hot drink, over the rim of my cup I noticed a couple of local squirrels scurrying about. That's it, I though and with much persuasion I was able to enlist the help of one of the critters! Thank God it was a macro shot because he had some serious height limitations. At any rate, I would like to give acclaim to this squirrel, as the photo I produced that day would not have been successful without him. This shows what a little persistence and ingenuity can accomplish. Thank you, again, squirrel.

Sunday, October 14, 2007

Sony A700's D-Range Optimizer

There are many new features and specs I was anxious to upgrade to with the new Sony A700, not the least of which was the D-Range Optimizer. The D-Range Optimizer automatically prevents loss of detail in dark shadow or bright highlight areas in strongly backlit or high contrast scenes. Although, somewhat skeptical of getting usable results with this feature, I believed it would be amazingly useful if it did work as intended. Imagine not having to dig out and work with filters or painstakingly have to rely on post-processing to save a picture whose exposure values were just too wide. After playing with the other various controls and features on the A700 (for a little bit), I decided to concentrate specifically on the D-Range Optimizer. As I'm sure most have figured out already, the D-Range stands for Dynamic Range and getting all the values properly exposed in certain photos with a large range has long been a pain for photographers. Let us see how the A700 handles such situations.
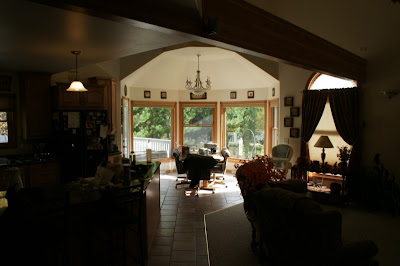

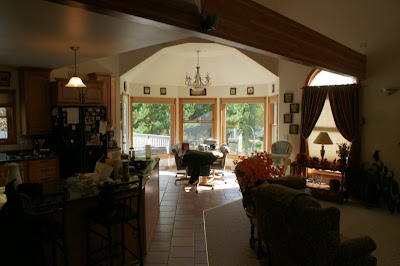
I chose a typical indoor scene which usually spells trouble for the camera trying to obtain proper exposure across the whole range. The scene has one standing in an interior shooting towards a window with bright sunlight. The view is wide enough to include much of the interior surrounding and in front of the window. Predictably, if we expose for the sunlight the rest of the scene goes very dark, as shown in the first shot above.
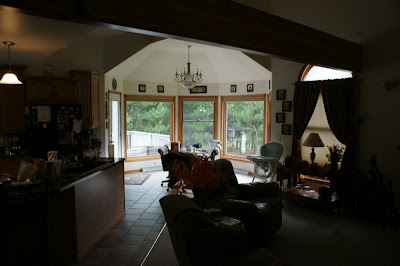
This was the first shot I took using the Optimizer and was meant to show how the scene would record using the camera's default value. Although, I thought this setting would be what the Sony labels (D-R) or the standard setting, somehow it wound up being (D-R+) or what Sony calls the Advanced Auto Setting.
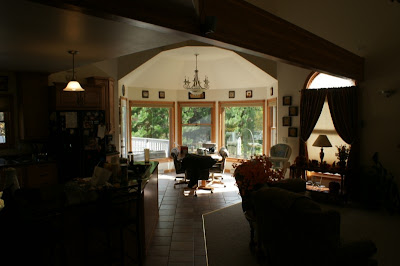

Later on, I figured out how to change the setting to standard or (D-R), which was very easy to do actually. And this setting is represented above.
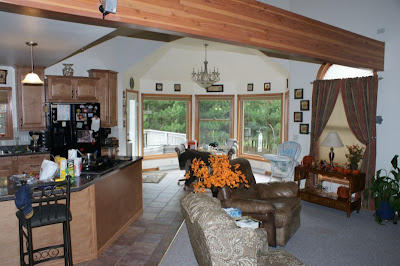

So then, for comparative purposes, I thought I would capture the scene using the camera's built-in flash and this is what we see here.


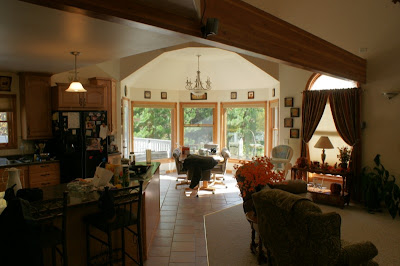
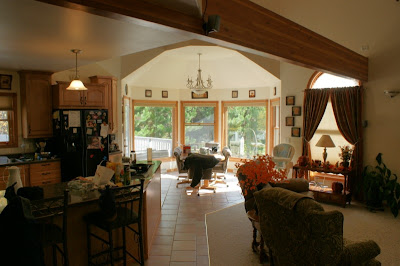
Now, on to the fun stuff. Sony's Advanced Level D-Range Optimization can be utilized through a five-step range, depending on the needs at the time.
Here is the scene recorded at Level 1.

Same scene at level 2.

Here is a Level 3 shot.
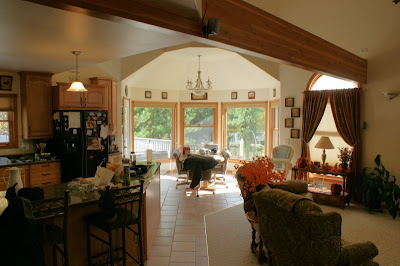

A shot at Level 4.
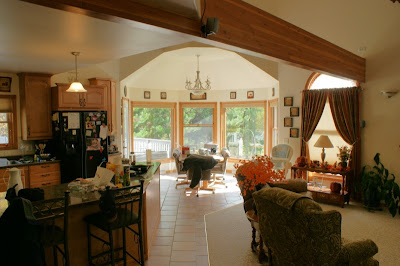

Here is Level 5, the highest setting.

I'll let everyone be their own judge here, as to the usefulness of this feature. It plainly did lighten up the shadows and expand the range of light values. Tell me what you think.


NOTE: To keep comparisons as accurate as possible, all shots in this post are presented with no post processing except to downsize them for web use. Notice even my typical copyright is not present.

^

Thursday, October 11, 2007

My New A700 Arrived


I arrived home from work yesterday to find my new baby waiting on me. My A700 has arrived safe and sound. I ordered it directly from Sony on Monday and received it yesterday, as I stated, with no special shipping. I was way too tired to try it out after a 17+ hour shift, so I will see what it offers today. I can tell you from the two minutes I did spend with it that the screen is awesome and beyond compare. Amazing! I can't post any further now as I must finally check out the new camera.

If you need a review of this camera
check out dpreview , Steve's Digicams, or imaging resource.
^

Tuesday, October 02, 2007

Bought Corel Paint Shop Pro Photo X2


I broke down and bought Corel Paint Shop Pro Photo X2 today. Maybe I'll be an Ansel Adams or a computer artist tomorrow. Of course, Ive owned the last four versions and it hasn't happened yet.

Tuesday, September 18, 2007

Corel Announces Paint Shop Pro Photo X2

Wow, well I was on hiatus from computing in general and blogging specifically, Corel snuck one in on me! Their newest version is entitled Corel Paint Shop Pro Photo X2. Could they make the title any longer?

This version offers an 'Express Lab' where one can supposedly edit dozens of photos in the time it used to take to edit just a few, partially because you don't have to wait for each individual photo to open. The new interface has gone dark, which seems to be the current rage in software (at least photo software). An exciting new feature is the ability to create HDR images and I'm looking forward to trying this out. There are now, also, new styles for layering ( whatever this means) and the ability to create visible watermarks. There is a new make up tool called 'Thinify', which just seems silly to me and several other program enhancements.

I can't wait to download the trial version and start putting this new program to the test. Hey, I guess I'll do that now.

Sunday, September 09, 2007

Sony A700 Finally Arrives

Now that Sony has finally announced the release of the A700, I am compelled to make an announcement of my own -

To anyone who is properly concerned, if you are willing to send me this new camera please contact me for my shipping address. She will be graciously accepted and used frequently. I will provide a good home for the precious A700 and give her all the care and support she so truly deserves.

Tomorrow is my brother's birthday. Perhaps he should consider buying me this camera for his birthday? It would make a great gift.


Tuesday, August 14, 2007

Swapping Heads with Paint Shop Pro

Swapping heads in photographs seems to be one of the favorite photo manipulations. This tutorial shows how easy the task can be using Paint Shop Pro. Start by opening both photos. Continue the process by using the Freehand Selection Tool, which is found under the Learning Centers Home page, picking Collage and then clicking Make Selections. Choose the Smart Edge option from the Tools Option Palette under selection type. Once your options are set, select the photo with the head you wish to use and you can begin tracing around the head. This should be done with several short selections. When the process is complete simply double click your mouse. Copy this selection to the clipboard by Pressing Ctrl + C, or choosing Edit Copy.

Now, make your receiving photo the active image (I chose an image of a couple of gay deputies from Sandstone County) and then press Ctrl + L, or choose Edit Paste As New Layer. From the Learning Center’s Home page, choose Collage, and then choose Move Collage Elements and the pick tool will be activated. Resize your head and rotate as necessary. Finally, move the head into it's final position and save your work.

Here, I have cropped the photo of the gay deputies from Sandstone County, so you could see the results better.

Sunday, August 12, 2007

Fixing Red Eyes with Paint Shop Pro

Red eyes (or green eyes with animals) is a common problem in flash photography and can ruin an otherwise great photo. As always, this is best avoided before the shutter is released. Having missed the opportunity to eliminate the problem beforehand it's time to fire up Paint Shop Pro.

With Paint Shop Pro the problem is sometimes easy to solve. Here is a quick fix for getting rid of red eye. Sometimes this fix will not be totally successful. In this case, Paint Shop Pro has other tricks up it's sleeve for fixing your red eye problem. The more advanced features will not be covered here, but will be addressed in another post at some future date. For now, try this quick fix and see if it isn't enough to improve your photos.


To attempt a quick fix go to the Learning Center's Home page and click on Retouch and Restore and then on Fix Red Eyes (of course). Zoom in on the eyes in your photo and place the circular cursor over the red portion of one of the eyes. Increase the size of this circle, if need be, in the Tool Options palette. Click the mouse and hopefully your problem is gone. If not hit undo, increase the cursor size and try it again. Repeat this process with all discolored eyes. Remember, there are more advanced methods to experiment with if this quick procedure just doesn't do the trick.

Monday, July 30, 2007

Straighten with Paint Shop Pro

Here is a photo which is completely out of kilter. Usually not a good thing.


This is an easy fix with Paint Shop Pro. If we go to the Learning Center we can click on Adjust and then Straighten. A straighten tool will then appear which can be lined up with a straight edge, in your photo, with the mouse. You will have to make a judgment call if there is no straight edge to go by. When you have the line exactly where you want it simply double click anywhere within the image.


You may wind up with an image which appears to be simply rotated by hand, such as shown above. While this may be an effect you want, in which case you are done, it is highly unlikely.


To have the image straightened and cropped back to a standard rectangular format, follow the steps above. This time just be sure to check the box in the tools option menu marked 'Crop Image'. This will probably more to your liking. Just remember when using this method that some of your image will be cropped away, along the edges.

Thursday, July 26, 2007

Email Photos with Paint Shop Pro

For a really, easy way to email your photos use Paint Shop Pro. Corel has a tutorial to show you how. No more sending oversize files that aggravate the recipient. No more guessing the optimum file size to send. Paint Shop Pro painlessly walks you through the process. Choose embedded or attachment, pick your size (three easy options, plus original or cell phone), and send them off to your chosen recipient.

Here, I chose to embed (nice option) the file. Optionally, I could have chosen to send the file as an attachment.

Tuesday, July 24, 2007

Even a Child Can Use Paint Shop Pro

I removed the background from this photo of my granddaughter.
Pretty awesome, huh?


Here is a drawing (her first ever) made by my granddaughter (shown above), in Paint Shop Pro. She drew it way back in March of '06. I wonder if she remembers it?


Removing Distractions from Your Photos

In this tutorial from Corel You learn how to remove unwanted items from your photographs, as the title implies. I decided to use their photo for this exercise. Removing unwanted objects was quite easy using the 'Object Remover Tool' found under the Retouch and Restore button. With this tool you simple drag the cursor around your unwanted object, while in the selection mode, and then select a replacement area, while in the source mode. The only caveat is that you should be very, careful when selecting your source area, so as to match the surrounding area you are eliminating as closely as possible. Take as many source samples as necessary to accomplish a maore natural end result.

In the edited photo you will notice the leash and the branch are both now gone. Perhaps it's time to get those distracting objects out of your photos.

Sunday, July 22, 2007

The Paint Shop Pro Crop Tool


Although, the best cropping should usually be done 'in camera', it doesn't always work out the way it should. Sometimes we need a little help, after the fact. As stated in Corel's tutorial, cropping is the quickest and easiest way to improve the composition of your photos. Paint Shop Pro allows you to select from standard photo sizes or to go completely free form. You decide what works best for your usage.


I have used the crop tool, here, to remove distracting elements and to emphasize the important part of the photo. No more arms and torsos of headless people. Much better.

Wednesday, July 18, 2007

Corel's Smart Photo Fix

Here is a poorly exposed photograph. I have tried the 'Learn How to Fix Photos the Smart Way' tutorial at Corel's site, to see if it would improve the picture.


The tutorial is pretty straightforward and I simply used the default settings, here. My photo is much lighter and definitely better exposed, now. A superb improvement with only a click of the mouse (once you are at the right screen). If desired one could adjust the brightness manually via the shadows, highlight, and/or the overall sliders. One can, also, manually adjust the saturation and sharpness in this screen. Using the advanced settings, you could continue to improve the color balance of the photo and adjust the lighter and darker areas of your photo using black and white set points. For this example I used no advanced settings and simply used the ones suggested by the program.

In the past, I have often found the 'Smart Photo Fix' generally and the 'suggested settings' specifically to do a great job much of the time. Often, though, I found it is better to manually adjust your photo with Paint Shop Pro's more general tools. It would probably be a good practice to try the Smart Photo Fix first. If this does not do the job sufficiently, or as you envisioned, then try doing the corrections yourself.

Tuesday, July 17, 2007

Give A Makeover with Paint Shop Pro

I tried Corel's 'Give a Makeover - It's Easy! ' tutorial and found they were correct - it is easy. I used their photo, for the first time, as I didn't want to offend anyone I know.


This tutorial is like four mini tutorials in one. It has to do with making over a subject in a portrait or any photo with people, for that matter. It leads you through the 'Retouch and Restore' section where you then find the Makeover button. Clicking here, you are then able to use the Blemish Fixer (easy), the Toothbrush for whitening teeth (easy), the Skin Smoothing Tool (easy), and finally the Suntan Tool (moderately easy, depending on your photo).

Quick and easy (is this getting monotonous) fixes all, for any of the subjects that may need a little touch up. Give these tools a try.

Tuesday, July 03, 2007

Removing Photo Backgrounds


Following the instructions in the Corel tutorial, "Remove Photo Backgrounds with the Background Eraser", I removed the boy from the photo on the right and added him to the photo on the left.

This was another quick and easy tutorial for Paint Shop Pro. All I had to do was use the background eraser to eliminate all elements from the right photo except the boy. Then, I simply copy and pasted the boy from one photo to the other. I moved the boy around with the pick tool and saved the new photo when the result is what I wanted. Doesn't get much simpler than this folks.

Resulting image


Monday, July 02, 2007

Make Your Own Vignette Frame

Another extremely, quick and simple Paint Shop Pro tutorial. This one is for making your own vignette frames, as the title implies. I did this example on-the-fly and didn't take a lot of time with it. Ideally, I should have used a lighter shade of green and cropped a little differently but, this is quite good considering the meager time invested.

All you really need to do, to create this effect, is to select your image and a complementing background color. From there you make your selection with the 'shape selection tool', invert your selection and then delete. Now crop to suit and your done. I told you it was quick and easy. Give it a try.